LogoLogo
Sign UpSupported Devices
  • Seam Documentation
  • 🚲Quick Start
  • 🚀Go Live!
  • Contact Us
  • Core Concepts
    • Overview
    • Seam Console
      • Seam Online CLI
    • Workspaces
    • Authentication
      • API Keys
      • Personal Access Tokens
      • Client Sessions and Client Session Tokens
        • Implementing Client Sessions for Device Management in the Backend
    • Devices
      • Displaying Device Health
      • Displaying Device Power Status
      • Managed and Unmanaged Devices
      • Adding Custom Metadata to a Device
      • Filtering Devices by Custom Metadata
      • Testing Your App Against Device Disconnection and Removal
    • Connected Accounts
      • Adding Custom Metadata to a Connected Account
      • Filtering Connected Accounts by Custom Metadata
      • Reconnecting an Account
    • Action Attempts
  • Capability Guides
    • 📋Device and System Capabilities
    • 🔒Smart Locks
      • Locking and Unlocking Smart Locks
      • Creating and Managing Smart Lock Access Codes
        • Creating Access Codes
        • Retrieving Access Codes
        • Modifying Access Codes
        • Deleting Access Codes
        • Lifecycle of Access Codes
        • Access Code Requirements for Door Locks
        • Streamlining Access Code Management from the Manufacturer App
        • Troubleshooting Access Codes
        • Managing Backup Access Codes
        • Managing Offline Access Codes
        • Creating and Updating Multiple Linked Access Codes
        • Migrating Existing Unmanaged Access Codes
    • 🏢Access Control Systems
      • ACS Quick Starts
        • PIN Code Quick Start
        • Encodable Key Card Quick Start
        • Mobile Key Quick Start
      • Connect an ACS to Seam
        • Retrieving ACS System Details
        • Access Control System Resources
        • Understanding Access Control System Differences
      • Managing ACS Users
        • Suspending and Unsuspending ACS Users
        • Assigning ACS Users to Access Groups
      • Retrieving Entrance Details
      • Managing Credentials
        • Assigning Credentials to ACS Users
        • Listing Credentials and Associated Entrances
      • Working with Card Encoders and Scanners
        • Creating and Encoding Card-based Credentials
        • Scanning Encoded Cards
      • Troubleshooting Your Access Control System
    • 📱Mobile Access
      • Prepare your Workspace
      • Managing Mobile App User Accounts with User Identities
      • Managing Phones for a User Identity
      • Issuing Mobile Credentials from an Access Control System
      • Developing in a Sandbox Workspace
      • Integrating into your Mobile Application
        • Initializing the Seam Mobile SDK
        • Handling System Permissions
        • Using Unlock With Tap
    • 🌡️Thermostats
      • Understanding Thermostat Concepts
        • HVAC Mode
        • Set Points
      • Retrieving Thermostats
      • Setting and Monitoring Temperature Thresholds
      • Setting the Current HVAC and Fan Mode Settings
      • Creating and Managing Climate Presets
        • Setting the Fallback Climate Preset
        • Activating a Climate Preset
      • Creating and Managing Thermostat Schedules
      • Testing Your Thermostat App with Simulate Endpoints
    • 👂Noise Sensors
      • Configuring Noise Threshold Settings
    • 📡Seam Bridge
  • 💻UI Components
    • 🔌Connect Webviews
      • Connect Webview Process
      • Embedding a Connect Webview in Your App
      • Verifying Successful Account Connection
      • Retrieving Devices or Access Control Systems Connected Through a Connect Webview
      • Attaching Custom Metadata to the Connect Webview
      • Filtering Connect Webviews by Custom Metadata
      • Customizing Connect Webviews
    • 🧱Seam Components
      • Getting Started with Seam Components
        • Get Started with React
        • Get started with Angular
        • Get started with Vue
        • Get started with Client Side Components
      • Components
        • Device Details
        • Device Table
        • Access Code Table
        • Access Code Details
        • Create Access Code Form
        • Update Access Code Form
        • Supported Devices Table
        • Seam Provider
        • Connect Account Button
      • Make a Supported Devices Page
      • Using User Identities to Scope Users' Device Access
  • 📋API Reference
    • Overview
    • Installation
    • Authentication
    • Workspaces
      • Get Workspace
      • Reset Workspace
    • Client Sessions
      • Create a Client Session
      • Get or Create a Client Session
      • List Client Sessions
      • Get a Client Session
      • Grant Access to a Client Session
      • Delete a Client Session
    • Connect Webviews
      • Create a Connect Webview
      • List Connect Webviews
      • Get a Connect Webview
      • Delete a Connect Webview
    • Connected Accounts
      • Get a Connected Account
      • List Connected Accounts
      • Update a Connected Account
      • Delete a Connected Account
    • Devices
      • List Devices
      • List Device Providers
      • Device Provider Metadata
      • Get a Device
      • Update a Device
      • Unmanaged Devices
        • Update an Unmanaged Device
        • List Unmanaged Devices
        • Get an Unmanaged Device
    • Access Codes
      • Create an Access Code
      • Create Multiple Linked Access Codes
      • List Access Codes
      • Get an Access Code
      • Update an Access Code
      • Update Multiple Linked Access Codes
      • Report Device Access Code Constraints
      • Delete an Access Code
      • Pull Backup Access Code
      • Unmanaged Access Codes
        • List Unmanaged Access Codes
        • Convert an Unmanaged Access Code
        • Delete an Unmanaged Access Code
    • Locks
      • Get Lock
      • Lock a Lock
      • Unlock a Lock
      • List Locks
    • Access Control Systems
      • Systems
        • List ACS Systems
        • Get an ACS System
        • List Compatible Credential Manager ACS Systems
      • ACS Users
        • Create an ACS User
        • List ACS Users
        • Get an ACS User
        • Update an ACS User
        • Suspend an ACS User
        • Unsuspend an ACS User
        • Delete an ACS User
        • Add an ACS User to an Access Group
        • Remove an ACS User from an Access Group
      • Entrances
        • List Entrances
        • Get an Entrance
        • List Credentials with Access to an Entrance
      • Access Groups
        • List Access Groups
        • Get an Access Group
        • Add an ACS User to an Access Group
        • Remove an ACS User from an Access Group
        • List ACS Users in an Access Group
      • Credentials
        • Create a Credential for an ACS User
        • Assign a Credential to an ACS User
        • List Credentials
        • Get a Credential
        • Update a Credential
        • Unassign a Credential from an ACS User
        • Delete a Credential
        • List Accessible Entrances
      • Encoders
        • Encode a Credential
        • Get an Encoder
        • List Encoders
        • Scan a Credential
        • Encoder Simulations
          • Simulate that the Next Credential Encoding Will Fail
          • Simulate that the Next Credential Encoding Will Succeed
          • Simulate that the Next Credential Scan Will Fail
          • Simulate that the Next Credential Scan Will Succeed
    • Noise Sensors
      • Noise Thresholds
        • Create Noise Thresholds
        • List Noise Thresholds
        • Update Noise Threshold
        • Delete Noise Threshold
    • Phones
      • Get a Phone
      • List Phones
      • Deactivate a Phone
      • Phone Simulations
        • Create a Sandbox Phone
    • Thermostats
      • List Thermostats
      • Set to Heat Mode
      • Set to Cool Mode
      • Set to Heat-Cool (Auto) Mode
      • Set to Off Mode
      • Set the HVAC Mode
      • Set Fan Mode
      • Activate a Climate Preset
      • Create a Climate Preset
      • Update a Climate Preset
      • Delete a Climate Preset
      • Set a Fallback Climate Preset
      • Set a Temperature Threshold
      • Thermostat Schedules
        • Get a Thermostat Schedule
        • List Thermostat Schedules
        • Create a Thermostat Schedule
        • Update a Thermostat Schedule
        • Delete a Thermostat Schedule
      • Thermostat Simulations
        • Temperature Reached
        • HVAC Mode Adjusted
    • User Identities
      • Create a User Identity
      • List User Identities
      • Get a User Identity
      • Update a User Identity
      • Add an ACS User to a User Identity
      • List ACS Users Associated with a User Identity
      • List ACS Systems Associated with a User Identity
      • Remove an ACS User from a User Identity
      • Grant a User Identity Access to a Device
      • List Accessible Devices for a User Identity
      • Revoke Access to a Device from a User Identity
      • Delete a User Identity
      • Enrollment Automations
        • Launch an Enrollment Automation
        • List Enrollment Automations
        • Get an Enrollment Automation
        • Delete an Enrollment Automation
    • Action Attempts
      • Get Action Attempt
    • Events
      • List Events
      • Get an Event
  • 🛠️Developer Tools
    • Webhooks
    • Seam CLI
    • Sandbox Devices and Systems
      • Sandbox 2N Intercoms
      • Sandbox 4SUITES Locks
      • Sandbox Akiles Locks
      • Sandbox ASSA ABLOY Credential Services
      • Sandbox ASSA ABLOY Visionline Access Control System
      • Sandbox August Locks
      • Sandbox Avigilon Alta Access System
      • Sandbox Brivo Access
      • Sandbox ControlByWeb Relays
      • Sandbox Doorking Callboxes
      • Sandbox dormakaba Oracode Locks
      • Sandbox ecobee Thermostats
      • Sandbox Genie Garage Openers
      • Sandbox Google Nest Thermostats
      • Sandbox Honeywell Resideo Thermostats
      • Sandbox igloohome Locks
      • Sandbox Kwikset Locks
      • Sandbox Latch Access Control System
      • Sandbox Linear Callboxes
      • Sandbox Lockly Locks
      • Sandbox Minut Sensors
      • Sandbox NoiseAware Sensors
      • Sandbox Nuki Locks
      • Sandbox PTI Storlogix Cloud
      • Sandbox Salto KS Access Control System
      • Sandbox Salto Locks
      • Sandbox Salto Space Access System
      • Sandbox Schlage Encode Locks
      • Sandbox Seam Bridge
      • Sandbox SmartThings Hub
      • Sandbox Tedee Locks
      • Sandbox TTLock Locks
      • Sandbox Wyze Locks
      • Sandbox Yale Locks
    • Rate Limits and Guardrails
    • Mobile SDKs
      • Android SDK
      • iOS SDK
  • 🎛️Device and System Integration Guides
    • Overview
    • 2N Intercom Systems
      • Get started with 2N Intercoms
    • 33 Lock Devices
      • Get started with 33 Lock devices
    • 4SUITES Locks
      • Get started with 4SUITES locks
    • Akiles Locks
      • Get started with Akiles locks
    • ASSA ABLOY Credential Services
    • ASSA ABLOY Visionline Access Control System
      • Visionline ACS Setup Instructions
        • Developing and Launching Your Visionline Plastic Card Encoding App
          • Developing Your Visionline Plastic Card Encoding App Using a Real Visionline Server
            • Step 1: Install Your Visionline Application
            • Step 2: Unblock Required Ports
            • Step 3: Configure a Visionline User Account
            • Step 4: Install a Visionline Card Encoder
            • Step 5: Set up Door Locks
            • Step 6: Program Door Locks
            • Step 7: Create a Production Workspace
            • Step 8: Connect Your Visionline Development Account to Seam
            • Next Steps
          • Developing Your Visionline Plastic Card Encoding App Using a Sandbox Workspace
            • Step 1: Create a Sandbox Workspace
            • Step 2: Connect the Virtual Visionline ACS to Seam
            • Next Steps
          • Launching Your Visionline Plastic Card Encoding App to a Live Site
            • Step 1: Confirm That Your Visionline Site Meets the Requirements
            • Step 2: Configure a Visionline User Account
            • Step 3: Purchase and Import the Callback Option from ASSA ABLOY
            • Step 4: Create a Production Workspace
            • Step 5: Connect Your Visionline Production Account to Seam
        • Developing and Launching Your Visionline Mobile Key App
          • Developing Your Visionline Mobile Key App
            • Step 1: Complete the ASSA ABLOY Mobile Development Course
            • Step 2: Install Your Visionline Application
            • Step 3: Unblock Required Ports
            • Step 4: Configure a Visionline User Account
            • Step 5: Set up Your Credential Services Account in Visionline
            • Step 6: Configure the Mobile Access UUID in Visionline
            • Step 7: Set up Door Locks with BLE Profiles
            • Step 8: Program Door Locks
            • Step 9: Create a Production Workspace
            • Step 10: Connect Your Visionline Development Account to Seam
            • Next Steps
          • Launching Your Visionline Mobile Key App
            • Step 1: Obtain ASSA ABLOY Certification for Your Mobile Key App
            • Step 2: Confirm That Your Visionline Site Meets the Requirements
            • Step 3: Confirm BLE Module on All Locks
            • Step 4: Set up Door Locks with BLE Profiles
            • Step 5: Program Door Locks
            • Step 6: Configure a Visionline User Account
            • Step 7: Purchase and Import the Callback and Mobile Service Options from ASSA ABLOY
            • Step 8: Create a Production Workspace
            • Step 9: Connect Your Visionline Production Account to Seam
      • Configuring Visionline Mobile Credentials
        • Issuing Various Types of Guest Mobile Credentials
        • Issuing Various Types of Guest Joiner Mobile Credentials
        • Retrieving Guest and Common Entrances
        • Checking if a User Identity Has a Phone That Is Set up for a Credential Manager
        • Updating Guest Mobile Credentials
        • Revoking Mobile Credentials
      • Mobile Credential-Related Properties
      • Common Use Cases
      • Special Requirements for Android Mobile Access SDK Development
      • Special Requirements for iOS Mobile Access SDK Development
      • Creating Visionline Card-based Credentials
    • August Locks
      • Get started with August locks
    • Avigilon Alta Access System
    • Brivo Access
    • Get started with ControlByWeb Devices
    • dormakaba Oracode Locks
      • Get started with dormakaba Oracode Locks
      • Creating dormakaba Oracode Offline Access Codes
    • ecobee Thermostats
      • Get Started with ecobee Thermostats
    • Google Nest Thermostats
      • Get Started with Nest Thermostats
      • Obtain Google Nest Device Access and Commercial Development
    • Honeywell Resideo Thermostats
      • Get Started with Honeywell Resideo Thermostats
    • igloohome Locks
      • Get started with igloohome Locks
      • Creating igloohome Offline Access Codes
    • Kwikset Locks
      • Get started with Kwikset Wi-Fi Locks
    • Latch Access Control System
      • Latch ACS Setup Instructions
      • Programming Code-Based Latch Credentials
      • Programming Latch ACS Mobile Credentials
    • Lockly Locks
      • Creating Lockly Offline Access Codes
    • Minut Sensors
      • Get started with Minut Sensors
    • NoiseAware Sensors
      • Get started with NoiseAware Sensors
    • Nuki Locks
      • Get Started with Nuki Locks
    • PTI Storlogix Cloud
    • Salto KS Access Control System
      • Salto KS Setup Instructions
      • Programming Salto KS PIN Code Credentials
      • Programming Salto KS Mobile Credentials
      • Special Requirements for Android Mobile Access SDK Development
    • Salto KS Locks
      • Get started with Salto KS Locks
    • Salto ProAccess Space Access System
      • Salto Space Setup Instructions
      • Programming Salto Space Card-based Credentials
      • Programming Salto Space Mobile Credentials
    • Schlage Locks
      • Schlage Locks Setup Instructions
      • Get started with Schlage Locks
    • SmartThings Hubs + Smart Locks
      • Get started with SmartThings Hubs + Smart Locks
    • Tedee Locks
      • Get Started with Tedee Locks
    • TTLock Locks
      • Get started with TTLock Locks
    • Wyze Locks
      • Get started with Wyze Locks
    • Yale Locks
      • Get started with Yale Locks
    • Get started with Smart Locks
  • Device Manufacturer Guidance
    • Creating a Seam-Compatible Intercom API
      • Creating OAuth Endpoints
      • Creating Intercom CRUD Endpoints
      • Creating Access Code CRUD Endpoints
      • Creating the Health Endpoint
    • Creating a Seam-Compatible Door Locks API
      • Creating OAuth Endpoints
      • Creating Door Lock CRUD Endpoints
      • Creating Access Code CRUD Endpoints
      • Creating the Health Endpoint
Powered by GitBook
LogoLogo

Get Started

  • Sign Up
  • Supported Devices

News

  • Changelog
  • Blog

Company

  • About
  • Privacy Notice

© Seam Labs, Inc. All rights reserved.

On this page

Was this helpful?

Edit on GitHub
  1. Device and System Integration Guides
  2. Wyze Locks

Get started with Wyze Locks

Learn how to connect and control your Wyze locks with the Seam API.

PreviousWyze LocksNextYale Locks

Last updated 5 months ago

Was this helpful?

Overview

Seam provides a universal API to connect and control many brands of locks. This guide provides a rapid introduction to connecting and controlling your locks using the Seam API. To learn more about other device brands supported by the Seam API, such as Yale, Schlage, Kwikset and August, head over to our .

For Gateway Wyze Locks we support all normal functionality including locking or unlocking the device and setting access codes remotely through Seam as long as the lock is proplery connected to the provided gateway.

For Bluetooth-only Wyze Lock Bolts we're not able to control the lock remotely (meaning no locking or unlocking the device and no setting access codes) but we are able to return some information on the lock such as the battery level and the locked / unlocked state.

1 — Install Seam SDK

npm i seam
pip install seam
# For some development environments, use pip3 in this command instead of pip.
bundle add seam
composer require seamapi/seam

Gradle:

// build.gradle
dependencies {
    implementation 'io.github.seamapi:java:0.x.x'
}

Maven:

<!-- pom.xml -->
<dependency>
    <groupId>io.github.seamapi</groupId>
    <artifactId>java</artifactId>
    <version>0.x.x</version>
</dependency>
go get github.com/seamapi/go
$ export SEAM_API_KEY=seam_test2ZTo_0mEYQW2TvNDCxG5Atpj85Ffw

This guide uses a Sandbox Workspace. Only virtual devices can be connected. If you need to connect a real Wyze device, use a non-sandbox workspace and API key.

2 — Link Your Wyze with Seam

Obtain a Wyze API Key and Wyze API Key ID

Note that both the API Key and Key ID returned from Wyze are required to connect your Wyze account to Seam. Make sure to copy both values to somewhere secure!

For Sandbox integrations, you can simply use ABC123ABC for both the API Key and API Key ID.

Request a Connect Webview

from seam import Seam

seam = Seam()

webview = seam.connect_webviews.create(accepted_providers=["wyze"])

assert webview.login_successful is False

# Send the webview URL to your user
print(webview.url)
import { Seam } from "seam";

const seam = new Seam();

const { connect_webview: connectWebview } = await seam.connectWebviews.create({
  accepted_providers: ["wyze"],
});

console.log(connectWebview.login_successful); // false

// Send the webview URL to your user
console.log(connectWebview.url);
require "seam"

seam = Seam.new(api_key: 'MY_API_KEY')

webview = seam.connect_webviews.create(accepted_providers: %w[wyze])

puts webview.login_successful # false

# Send the webview URL to your user
puts webview.url
use Seam\SeamClient;

$seam = new SeamClient("YOUR_API_KEY");

$webview = $seam->connect_webviews->create(
  accepted_providers: ["wyze"]
);

Authorize Your Workspace

  • Wyze API Key ID: ABC123ABC

  • Wyze API Key ABC123ABC

  • email: jane@example.com

  • password: 1234

Confirm the Connect Webview was successful by querying its status:

updated_webview = seam.connect_webviews.get(connect_webview_id: webview.connect_webview_id)

assert updated_webview.login_successful # true
const updatedWebview = await seam.connectWebviews.get(
  connectWebview.connect_webview_id
);

console.log(updatedWebview.login_successful); // true
updated_webview = seam.connect_webviews.get(connect_webview_id: webview.connect_webview_id)

puts updated_webview.login_successful # true
$webview = $seam->connect_webviews->get('729847ff-98e0-418d-aeba-1e3cb38157c6');
assert($webview->status == 'pending');

3 — Retrieve Wyze Devices

After a Wyze account is linked with Seam, you can retrieve its devices.

all_locks = seam.locks.list()

some_lock = all_locks[0]

assert some_lock.properties["battery_level"] is True

print(some_lock)
const allLocks = await seam.locks.list();

const someLock = allLocks[0];

console.log(someLock.properties.battery_level);

console.log(someLock);
some_lock = seam.locks.list.first

puts some_lock.properties.battery_level

puts some_lock
use Seam\SeamClient;

$seam = new SeamClient('YOUR_API_KEY');

$locks = $seam->locks->list();

echo json_encode($locks);

*/

4 — Locking & Unlocking a Door

Next, you can perform the basic action of locking and unlocking the door.

Unlock a door

POST https://connect.getseam.com/locks/unlock_door

Request Body

Name
Type
Description

device_id

String

# lock the door
seam.locks.lock_door(device_id: some_lock.device_id)
updated_lock = seam.locks.get(device_id: some_lock.device_id)
assert updated_lock.properties["locked"] is True

# Now unlock the door
seam.locks.unlock_door(device_id: some_lock.device_id)
updated_lock = seam.locks.get(device_id: some_lock.device_id)
assert updated_lock.properties["locked"] is False
// lock the door
await seam.locks.lockDoor(someLock.device_id);
const updatedLock = await seam.locks.get(someLock.device_id);
console.log(updatedLock.properties.locked); // true

// unlock the door
await seam.locks.unlockDoor(someLock.device_id);
updatedLock = await seam.locks.get(someLock.device_id);
console.log(updatedLock.properties.locked); // false
# lock the door
seam.locks.lock_door(device_id: some_lock.device_id)
updated_lock = seam.locks.get(device_id: some_lock.device_id)
puts updated_lock.properties.locked # true

# unlock the door
seam.locks.unlock_door(device_id: some_lock.device_id)
updated_lock = seam.locks.get(device_id: some_lock.device_id)
puts updated_lock.properties.locked # false
use Seam\SeamClient;

$seam = new SeamClient('YOUR_API_KEY');

$some_lock = $seam->locks->list()[0];

# unlock the door
$seam->locks->unlock_door($lock->device_id);
# lock the door
$seam->locks->lock_door($lock->device_id);

5 — Programming Access Code on a Wyze Lock

Wyze does not allow pin code values to be seen after the code is created. If you create a code through Seam, avoid changing the pin code through the app and instead use Seam to change any information about the code!

# create an ongoing code
seam.access_codes.create(
  device=some_lock,
  name="Personal Access Code")

# create a timebound code
seam.access_codes.create(
  device=some_lock,
  name="My Temp Access Code",
  starts_at="2028-08-12T19:23:42+0000",
  ends_at="2028-08-13T19:23:42+0000")

# you can use a device or a device_id as the "device" parameter
seam.access_codes.list(device=some_lock)

# [
#   AccessCode(access_code_id='631a3a30-3fa7-462a-b3bc-65528ccf8765', type='time_bound', code=None, starts_at='2028-08-12T19:24:00.000Z', ends_at='2028-08-13T19:24:00.000Z', name='My Temp Access Code', status='unset', common_code_key=None),
#  AccessCode(access_code_id='4d2f4952-5446-4051-ba7e-a6fc01a376d7', type='ongoing', code='123*12346', starts_at=None, ends_at=None, name='Personal Access Code', status='set', common_code_key=None)
#  ]
// create an ongoing code
await seam.accessCodes.create({
  device_id: someLock.device_id,
  name: "Personal Access Code",
});

// create a timebound code
await seam.accessCodes.create({
  device_id: someLock.device_id,
  name: "My Temp Access Code",
  starts_at: "2028-11-12T19:23:42+0000",
  ends_at: "2028-11-13T19:23:42+0000",
});

// use a device_id as the "device_id" parameter
await seam.accessCodes.list({
  device_id: someLock.device_id,
});

/*
[
  {
    access_code_id: '631a3a30-3fa7-462a-b3bc-65528ccf8765',
    device_id: '681bf7bc-e7c6-48e6-acfe-6dbabd0615c5',
    name: 'My Temp Access Code',
    code: null,
    is_waiting_for_code_assignment: true,
    common_code_key: null,
    type: 'time_bound',
    status: 'unset',
    starts_at: '2028-08-12T19:24:00.000Z',
    ends_at: '2028-08-13T19:24:00.000Z',
    created_at: '2023-02-08T23:28:57.061Z',
    errors: [],
    warnings: []
  },
  {
    access_code_id: '774986f8-5fad-4911-a4fb-e5a2ef9f15bd',
    device_id: '681bf7bc-e7c6-48e6-acfe-6dbabd0615c5',
    name: 'Personal Access Code',
    code: '123*12346',
    common_code_key: null,
    type: 'ongoing',
    status: 'set',
    created_at: '2023-02-08T23:10:54.096Z',
    errors: [],
    warnings: []
  },
]
*/
# create an ongoing code
seam.access_codes.create(
  device_id: some_lock.device_id, name: 'Personal Access Code'
)

# create a timebound code
seam.access_codes.create(
  device_id: some_lock.device_id,
  name: 'My Temp Access Code',
  starts_at: '2028-08-12T19:23:42+0000',
  ends_at: '2028-08-13T19:23:42+0000'
)

seam.access_codes.list(device_id: some_lock.device_id)

# [<Seam::AccessCode:0x00690
#   access_code_id="631a3a30-3fa7-462a-b3bc-65528ccf8765"
#   name="My Temp Access Code"
#   code=nil
#   type="time_bound"
#   starts_at=2028-08-12 19:24:00 UTC
#   ends_at=2028-08-13 19:24:00 UTC
#   errors=[]
#   warnings=[]>, <Seam::AccessCode:0x006b8
#   access_code_id="774986f8-5fad-4911-a4fb-e5a2ef9f15bd"
#   name="Personal Access Code"
#   code="123*12346"
#   type="ongoing"
#   errors=[]
#   warnings=[]>]
use Seam\SeamClient;

$seam = new SeamClient("YOUR_API_KEY");

$some_lock = $seam->locks->list()[0];
$seam->access_codes->create(
  device_id: $some_lock->device_id, name: 'Personal Access Code'
);

$seam->access_codes->create(
  device_id: $some_lock->device_id,
  name: 'My Temp Access Code',
  starts_at: '2028-08-12T19:23:42+0000',
  ends_at: '2028-08-13T19:23:42+0000'
);

echo json_encode($access_code)
/*
[{"access_code_id":"19cea367-fd8c-40b7-9ce3-6dec76fe1763","name":"My Temp Access Code","type":"time_bound","status":"unset","starts_at":"2028-08-12T19:24:00.000Z","ends_at":"2028-08-13T19:24:00.000Z","code":null,"created_at":"2023-02-09T05:53:46.293Z","errors":[],"warnings":[]},{"access_code_id":"f797a8f0-b8f7-4734-9bea-962de5cad413","name":"Personal Access Code","type":"ongoing","status":"set","starts_at":null,"ends_at":null,"code":"123*12346","created_at":"2023-02-09T05:53:46.172Z","errors":[],"warnings":[]}]
*/

Next Steps

Now that you've completed this guide, you can try to connect a real Wyze device. To do so, make sure to switch to a non-sandbox workspace and API key as real devices cannot be connected to sandbox workspaces.

In addition, if you'd like to explore other aspects of Seam, here is a list of helpful resources:

If you have any questions or want to report an issue, email us at support@seam.co.

There are two types of Wyze Locks, a that supports Wi-Fi connections and a that supports bluetooth connections only.

Seam provides client libraries for many languages, such as JavaScript, Python, Ruby, PHP, and others, as well as a Postman collection and spec.

JavaScript / TypeScript (, )

Python (, )

Ruby Gem (, )

PHP (, )

Java ()

C# (, )

Go ()

Install using .

Once installed, to get your API key, and export it as an environment variable:

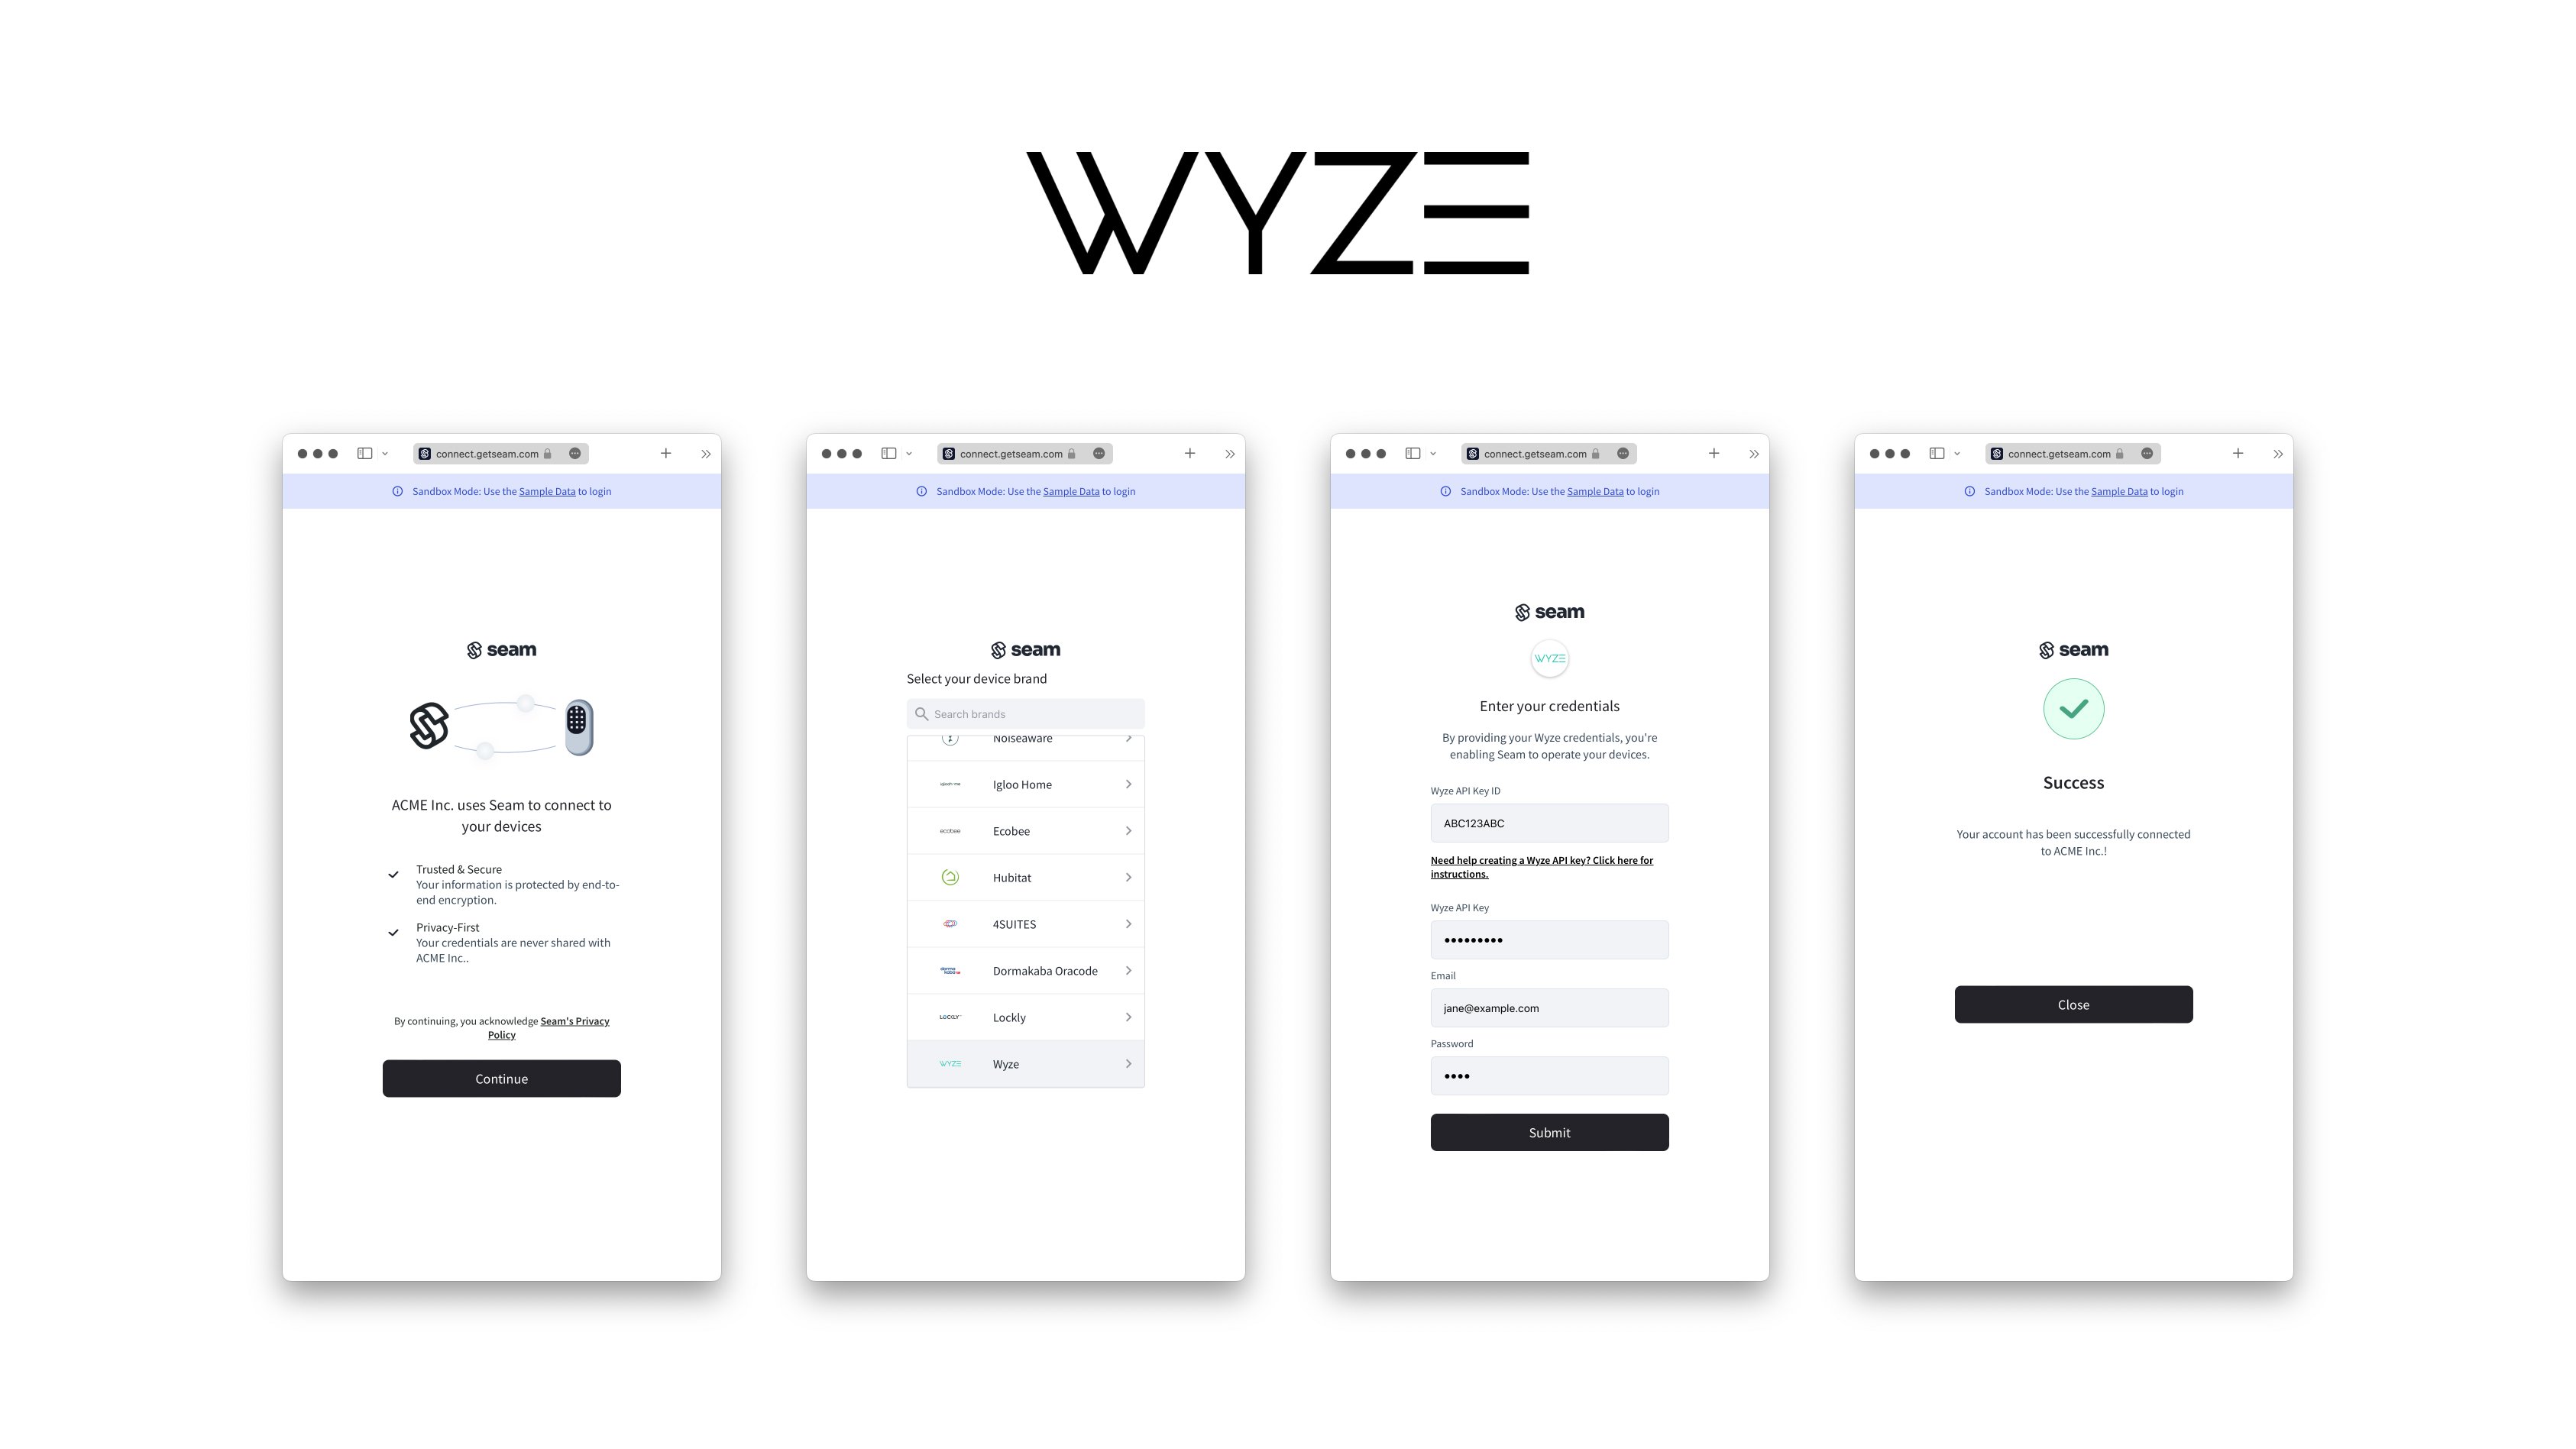
To control your Wyze locks via the Seam API, you must first authorize your Seam workspace against your Wyze account. To do so, Seam provides: pre-built UX flows that walk you through authorizing your application to control Wyze locks.

You will need create a Wyze API Key for your Wyze account. To see how to create a Wyze API Key for your Wyze account, .

Navigate to the URL returned by the Webview object. Since you are using a sandbox workspace, complete the login flow by entering the Wyze credentials below:

The Seam API lets you create access codes on Wyze locks with a gateway. These codes can then be entered to unlock the door. You can find out more info about how Seam access codes in our

for

🎛️
Gateway Wyze Lock
Wyze Lock Bolt
OpenAPI
npm
GitHub
pip
GitHub
rubygem
GitHub
packagist
GitHub
GitHub
nuget
GitHub
GitHub
nuget
sign-up for Seam
Connect Webviews
click here
sandbox test account
core concept section on access codes.
Yale Getting Started Guide
August Getting Started Guide
Schlage Getting Started Guide
SmartThings Getting Started Guide
Receiving webhook
device events
Core Concepts
Wyze
integration page
Seam Connect Webview flow to connect Wyze account with Seam
  • Overview
  • 1 — Install Seam SDK
  • 2 — Link Your Wyze with Seam
  • 3 — Retrieve Wyze Devices
  • 4 — Locking & Unlocking a Door
  • POST/locks/lock_door
  • Unlock a door
  • 5 — Programming Access Code on a Wyze Lock
  • Next Steps
post

Lock a Door

Body
device_idstringOptional
Responses
200
Returns a pending action result
post
POST /locks/lock_door HTTP/1.1
Host: 
Content-Type: application/json
Accept: */*
Content-Length: 20

{
  "device_id": "text"
}
200

Returns a pending action result

No content